
There’s nothing quite like the heavenly aroma of apples and cinnamon wafting through the kitchen. Apple puff pastries are one of those timeless desserts that look fancy but are surprisingly easy to make. Whether you’re hosting a dinner party or just treating yourself, these flaky delights always hit the sweet spot.
I’ve always loved how versatile puff pastry can be. From savory snacks to sweet treats, it’s a kitchen staple that pairs beautifully with the warm, comforting flavor of apples. This article will take you step by step through everything you need to know about crafting the perfect apple puff pastry. Let’s get baking!
If you love desserts that highlight the natural sweetness of apples, don’t miss our guide to Homemade Fresh Apple Cake: A Moist and Flavorful Treat. It’s another perfect way to enjoy the bounty of apple season!
Introduction to Apple Puff Pastry
What is Apple Puff Pastry?
Apple puff pastry is a dessert made by wrapping a flaky, buttery pastry dough around sweetened apple filling. The combination of crispy layers and gooey apples creates a textural and flavorful contrast that’s hard to resist.
This dessert has roots in classic European pastry-making traditions, often served with powdered sugar or a drizzle of icing. Today, it’s a beloved treat worldwide, especially during the fall season when apples are at their peak.
Why It’s a Favorite Dessert Choice
What makes apple puff pastry so popular? For starters, it’s a quick and impressive dessert. With pre-made puff pastry, you can create a bakery-worthy dessert in under an hour. Its versatility allows you to adapt the flavors to suit your taste—think cinnamon, nutmeg, or even caramel.
Moreover, apple puff pastry is perfect for all occasions. Whether you need a dessert for a festive gathering or a comforting treat on a cold day, it’s always a crowd-pleaser. Pair it with a dollop of whipped cream or a scoop of vanilla ice cream, and you’ve got a dessert worth savoring.
Choosing the Perfect Apples for Puff Pastry
Best Apple Varieties for Baking
When it comes to apple puff pastry, not all apples are created equal. The best apples for this dessert strike a balance between sweetness and tartness, holding their shape during baking without turning into mush.
Here are some ideal apple varieties for puff pastry:
- Granny Smith Apples: Known for their tart flavor and firm texture, they contrast beautifully with the sweetness of the pastry and filling.
- Honeycrisp Apples: These apples are crisp and sweet, providing a natural sweetness without overpowering the dessert.
- Fuji Apples: Slightly softer than Granny Smith or Honeycrisp, Fuji apples bring a delightful mix of sweetness and juiciness.
- Braeburn Apples: A great choice for balanced flavor, Braeburns are both tangy and sweet, and they bake well without losing texture.
Characteristics of Good Apples for Puff Pastry
When selecting apples, keep these qualities in mind:
- Firm Texture: The apple should hold its shape when baked. Softer varieties like Red Delicious may not work as well, as they can become mushy.
- Balanced Flavor: A mix of sweet and tart makes the filling more dynamic and flavorful.
- Low Water Content: Excess moisture can make the puff pastry soggy, so choose apples that don’t release too much juice when cooked.
To enhance the flavor, you can also mix different apple varieties. For example, pairing Granny Smith with Honeycrisp creates a perfect blend of tartness and sweetness.
By starting with the right apples, you set the foundation for a filling that complements the buttery layers of puff pastry. Next, we’ll explore how store-bought puff pastry can simplify the process without sacrificing flavor!
Using Store-Bought Puff Pastry: Pros and Cons
Benefits of Store-Bought Puff Pastry
Using store-bought puff pastry is a game-changer for home bakers, offering convenience without compromising on taste or quality. Here are the key benefits:
- Time-Saving: Making puff pastry from scratch requires folding and rolling the dough multiple times—a process that can take hours. Store-bought puff pastry allows you to skip this step and jump straight into baking.
- Consistent Results: Pre-made puff pastry is manufactured with precision, ensuring the layers are evenly distributed for that perfect flaky texture.
- Easily Available: Most grocery stores stock puff pastry sheets in the frozen section, making it easy to keep a supply on hand for last-minute desserts.
With store-bought puff pastry, even beginner bakers can achieve professional-looking apple puff pastries without stress.
How to Properly Handle Frozen Puff Pastry
To get the best results from store-bought puff pastry, handling it correctly is essential:
- Thaw It Properly: Always thaw puff pastry in the refrigerator. This prevents the butter layers from melting prematurely, which could ruin the flaky texture. Avoid leaving it at room temperature for too long, as it can become too soft and difficult to work with.
- Keep It Cool: Work with puff pastry on a cool surface and avoid overhandling it. Warm hands can cause the layers to stick together.
- Roll Gently: If the pastry needs to be rolled out, do so lightly and in one direction to preserve its structure.
Store-bought puff pastry ensures you can focus on creating the perfect apple filling and assembling your pastries. Up next, we’ll dive into crafting a delicious filling that pairs beautifully with the flaky dough!
Preparing the Apple Filling for Puff Pastry
Ingredients for the Apple Filling
The secret to a mouthwatering apple puff pastry lies in a perfectly balanced filling. Here’s what you’ll need:
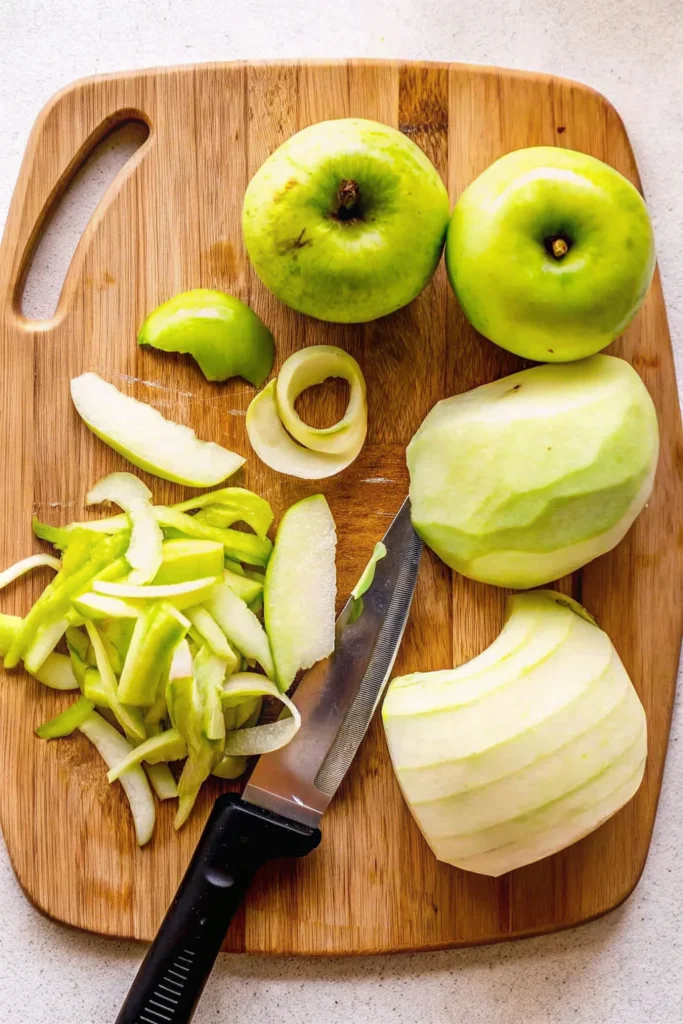
- Apples (Granny Smith, Honeycrisp, or Fuji): 3-4 medium-sized apples, peeled, cored, and sliced.
- Brown Sugar: 1/4 cup for a rich, caramel-like sweetness.
- Granulated Sugar: 2 tablespoons for a balanced sweetness.
- Ground Cinnamon: 1 teaspoon for that classic warm spice.
- Nutmeg (optional): 1/4 teaspoon for added depth.
- Cornstarch: 1 tablespoon to thicken the filling and prevent sogginess.
- Lemon Juice: 1 tablespoon to enhance flavor and prevent apples from browning.
- Butter: 2 tablespoons for a silky, caramelized texture.
Tips for Making a Non-Soggy Filling
A soggy filling can ruin the crisp layers of puff pastry. Follow these tips to ensure your filling stays just right:
- Pre-Cook the Apples:
Cook the apples on medium heat in a pan with butter, sugar, and spices for about 5-7 minutes. This step reduces excess moisture and enhances the caramelized flavors. Add the cornstarch mixed with a bit of water during cooking to thicken the mixture. - Cool the Filling Completely:
Before assembling your pastries, let the filling cool to room temperature. Warm filling can melt the butter in the puff pastry, making it less flaky. - Use a Light Layer of Filling:
Avoid overfilling the pastries. A small amount of filling goes a long way, ensuring even baking and a balanced texture. - Drain Excess Liquid:
If your apples release a lot of juice during cooking, strain it before using the filling to prevent soggy pastries.
With a perfectly prepared filling, you’re ready to assemble and bake stunning apple puff pastries. Next, we’ll walk through the step-by-step process of putting it all together!
Step-by-Step Guide to Making Apple Puff Pastries
Rolling Out the Puff Pastry
- Thaw and Prepare:
Begin by thawing the puff pastry in the refrigerator for 2-3 hours. When ready, lightly flour your work surface and rolling pin to prevent sticking. - Roll It Out:
If your pastry sheets are too thick, gently roll them out to about 1/8-inch thickness. This ensures even baking and a light, crispy texture. - Cut the Pastry:
Use a sharp knife or pizza cutter to divide the pastry into even squares or rectangles, depending on the shape you prefer for your pastries.
Looking for more creative dessert ideas? Check out our recipe for Cinnamon Roll Apple Pie to explore another way to enjoy warm, spiced apples wrapped in pastry
Filling and Folding Techniques
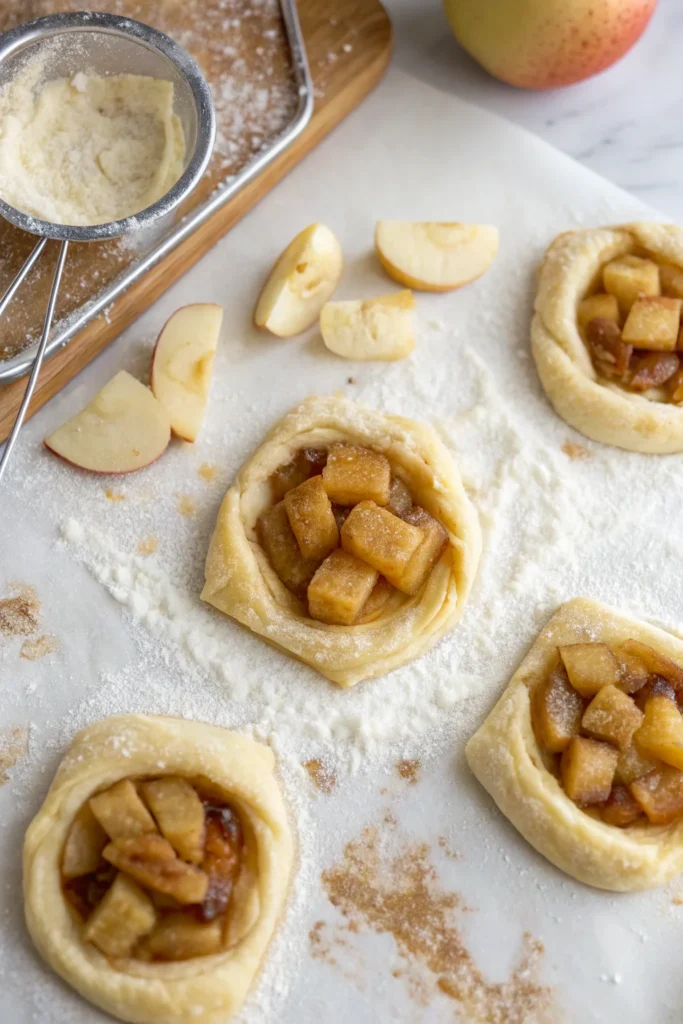
- Add the Apple Filling:
Place a spoonful of the cooled apple filling in the center of each pastry square. Avoid overfilling to prevent leaks during baking. - Folding Styles:
- Turnovers: Fold the pastry diagonally to form a triangle and press the edges with a fork to seal.
- Envelopes: Fold the four corners toward the center to enclose the filling.
- Open-Faced: Leave the filling exposed in the center and fold up the edges slightly to create a tart-like shape.
- Seal Properly:
Brush the edges of the pastry with a beaten egg or milk before sealing. This acts as glue and ensures the pastries stay closed during baking.
Tips for Achieving a Golden, Flaky Crust
- Egg Wash:
For a beautifully golden crust, brush the tops of the pastries with a mixture of beaten egg and a splash of water. - Add Sugar:
Sprinkle coarse sugar on top for extra crunch and sweetness. - Ventilation:
Use a sharp knife to make small slits on the top of sealed pastries. This allows steam to escape, preventing sogginess. - Chill Before Baking:
Once assembled, chill the pastries in the refrigerator for 15-20 minutes. This helps the butter in the dough remain cold, resulting in flakier layers.
Baking Instructions
- Preheat the Oven:
Set the oven to 375°F (190°C) and line a baking sheet with parchment paper. - Bake:
Arrange the pastries on the prepared baking sheet, leaving some space between them. Bake for 20-25 minutes or until the pastries are golden brown and puffed. - Cool:
Allow the pastries to cool for 5-10 minutes before serving.
Now that you’ve assembled and baked your apple puff pastries, it’s time to ensure they’re baked to perfection. Up next, we’ll discuss ideal baking temperatures and tips for consistent results!
Baking Apple Puff Pastries to Perfection
Ideal Baking Temperature and Time
Getting the perfect bake on your apple puff pastries requires attention to temperature and timing:
- Preheating the Oven:
Always preheat your oven to 375°F (190°C) before baking. Puff pastry relies on consistent high heat to create steam, which forms the flaky layers. - Baking Time:
- Standard-sized pastries take about 20-25 minutes to bake.
- Mini versions or smaller shapes may only need 15-20 minutes.
Keep an eye on the pastries after the 15-minute mark to prevent over-browning.
- Positioning in the Oven:
Place the baking tray on the middle rack to ensure even heat distribution. If baking multiple trays, rotate them halfway through for consistent results.
How to Check If Your Pastries Are Done
- Color and Texture:
The pastries should be golden brown on the outside, with visible puffed layers. The edges should be crisp, and the bottom should be dry and firm. - Sound Test:
Gently tap the top of the pastry. A hollow sound indicates that the layers have cooked through. - No Doughy Centers:
If the top looks ready but the center feels soft or doughy, bake for an additional 3-5 minutes. Cover with aluminum foil if the tops are browning too quickly.
Post-Baking Tips
- Cooling:
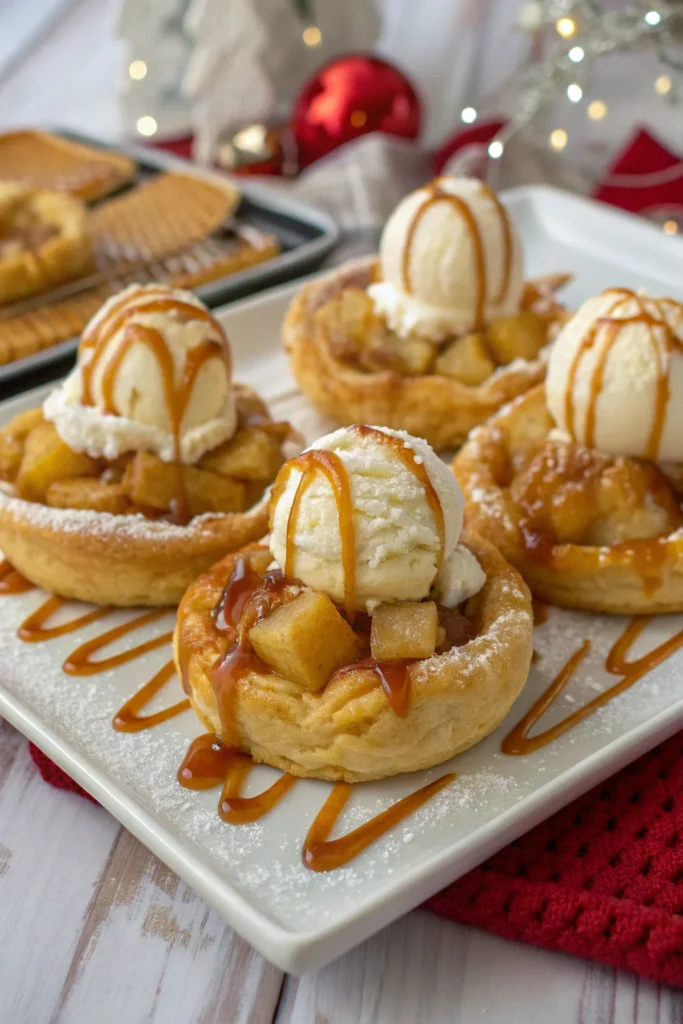
Allow the pastries to cool for 5-10 minutes on a wire rack. This prevents condensation from making the bottoms soggy. - Finishing Touches:
- Dust with powdered sugar for a classic look.
- Drizzle with caramel or icing for extra sweetness.
Perfect baking ensures that your apple puff pastries have that irresistible balance of flaky, crispy layers and warm, gooey apple filling. Next, we’ll explore tips for preparing apple puff pastries ahead of time!
Tips for Preparing Apple Puff Pastries Ahead of Time
How to Assemble Pastries for Later Baking
Prepping apple puff pastries in advance is a great time-saver, especially for busy schedules or entertaining guests. Here’s how to do it effectively:
- Prepare the Filling in Advance:
Cook and cool the apple filling up to 2 days ahead. Store it in an airtight container in the refrigerator. - Assemble the Pastries:
- Roll out the puff pastry and fill it as usual.
- Seal the edges securely using an egg wash or water to prevent leaks during storage.
- Chill Before Storing:
After assembling, place the pastries on a baking sheet lined with parchment paper and chill them in the refrigerator for about 30 minutes. This ensures the dough stays firm.
Storing Assembled but Unbaked Pastries
- Refrigerator Storage:
- Cover the assembled pastries with plastic wrap and refrigerate for up to 24 hours.
- Bake them directly from the refrigerator—no need to bring them to room temperature.
- Freezer Storage:
- Arrange the pastries on a tray, ensuring they don’t touch. Freeze until firm, then transfer them to an airtight container or freezer bag.
- Frozen pastries can be stored for up to 1 month.
- Bake straight from the freezer, adding 5-7 minutes to the baking time.
Preparing pastries ahead of time allows you to serve freshly baked treats with minimal effort. In the next section, we’ll discuss how to store and reheat leftover apple puff pastries to maintain their flavor and texture.
Proper Storage for Leftover Apple Puff Pastries
Storing in the Refrigerator
Leftover apple puff pastries can be enjoyed later if stored properly to retain their crispness and flavor:
- Cool Completely:
Allow the pastries to cool to room temperature before storing. Placing warm pastries in the refrigerator can create condensation, leading to soggy layers. - Use Airtight Containers:
Place the pastries in a single layer in an airtight container. If stacking is necessary, separate the layers with parchment paper to prevent sticking. - Refrigeration Time:
Apple puff pastries can be refrigerated for up to 3 days. Beyond this, they may lose their freshness and texture.
Freezing Leftover Pastries
If you need to store the pastries for longer, freezing is a great option:
- Wrap Individually:
Wrap each pastry in plastic wrap or aluminum foil to prevent freezer burn. - Use Freezer-Safe Containers:
Place the wrapped pastries in a freezer-safe container or zip-top bag. Remove as much air as possible to maintain freshness. - Freezing Duration:
Frozen pastries can be stored for up to 1 month.
Reheating Methods for Best Results
Reheating properly ensures your leftovers taste as good as freshly baked:
- Oven Reheating (Recommended):
- Preheat the oven to 350°F (175°C).
- Place the pastries on a baking sheet lined with parchment paper and heat for 8-10 minutes.
- This method restores the flaky texture and warm filling.
- Air Fryer Method:
- Heat the pastries in an air fryer at 325°F (160°C) for 5-7 minutes.
- This is a quick way to achieve crispness.
- Avoid Microwave Reheating:
While convenient, the microwave tends to make puff pastry soggy, losing its signature flakiness.
By following these storage and reheating tips, you can enjoy apple puff pastries anytime without compromising on taste or texture. Up next, we’ll explore creative ways to put a twist on the classic apple puff pastry recipe!
Creative Variations of Apple Puff Pastry Recipes
Adding Spices or Flavored Syrups
Elevate the classic apple puff pastry by experimenting with spices and syrups:
- Spiced Fillings:
- Add a pinch of cardamom for a floral and citrusy twist.
- Incorporate allspice for a warm, aromatic flavor.
- Mix in a dash of ginger powder for a subtle kick.
- Flavored Syrups:
- Drizzle maple syrup over the filling for a caramel-like depth.
- Use a touch of vanilla extract to enhance the sweetness.
- For a festive vibe, add rum or brandy for a hint of boozy warmth.
Incorporating Other Fruits or Nuts
Make your apple puff pastries more dynamic by adding complementary fruits and nuts:
- Fruits:
- Combine sliced apples with pears for a softer, sweeter filling.
- Add a handful of raisins or cranberries for tartness and texture.
- Layer thin slices of peaches for a summer twist.
- Nuts:
- Sprinkle chopped walnuts or pecans over the apple filling for crunch.
- Add a layer of almond paste beneath the filling for a nutty undertone.
Mini Puff Pastries and Unique Shapes
Get creative with the presentation of your apple puff pastries:
- Mini Puff Pastries:
- Create bite-sized treats by cutting smaller pastry squares. These are perfect for parties or as snack-sized desserts.
- Braided Pastries:
- Lay the filling in the center of a pastry rectangle and cut slits along the sides. Fold the strips over the filling in a crisscross pattern for a decorative braid.
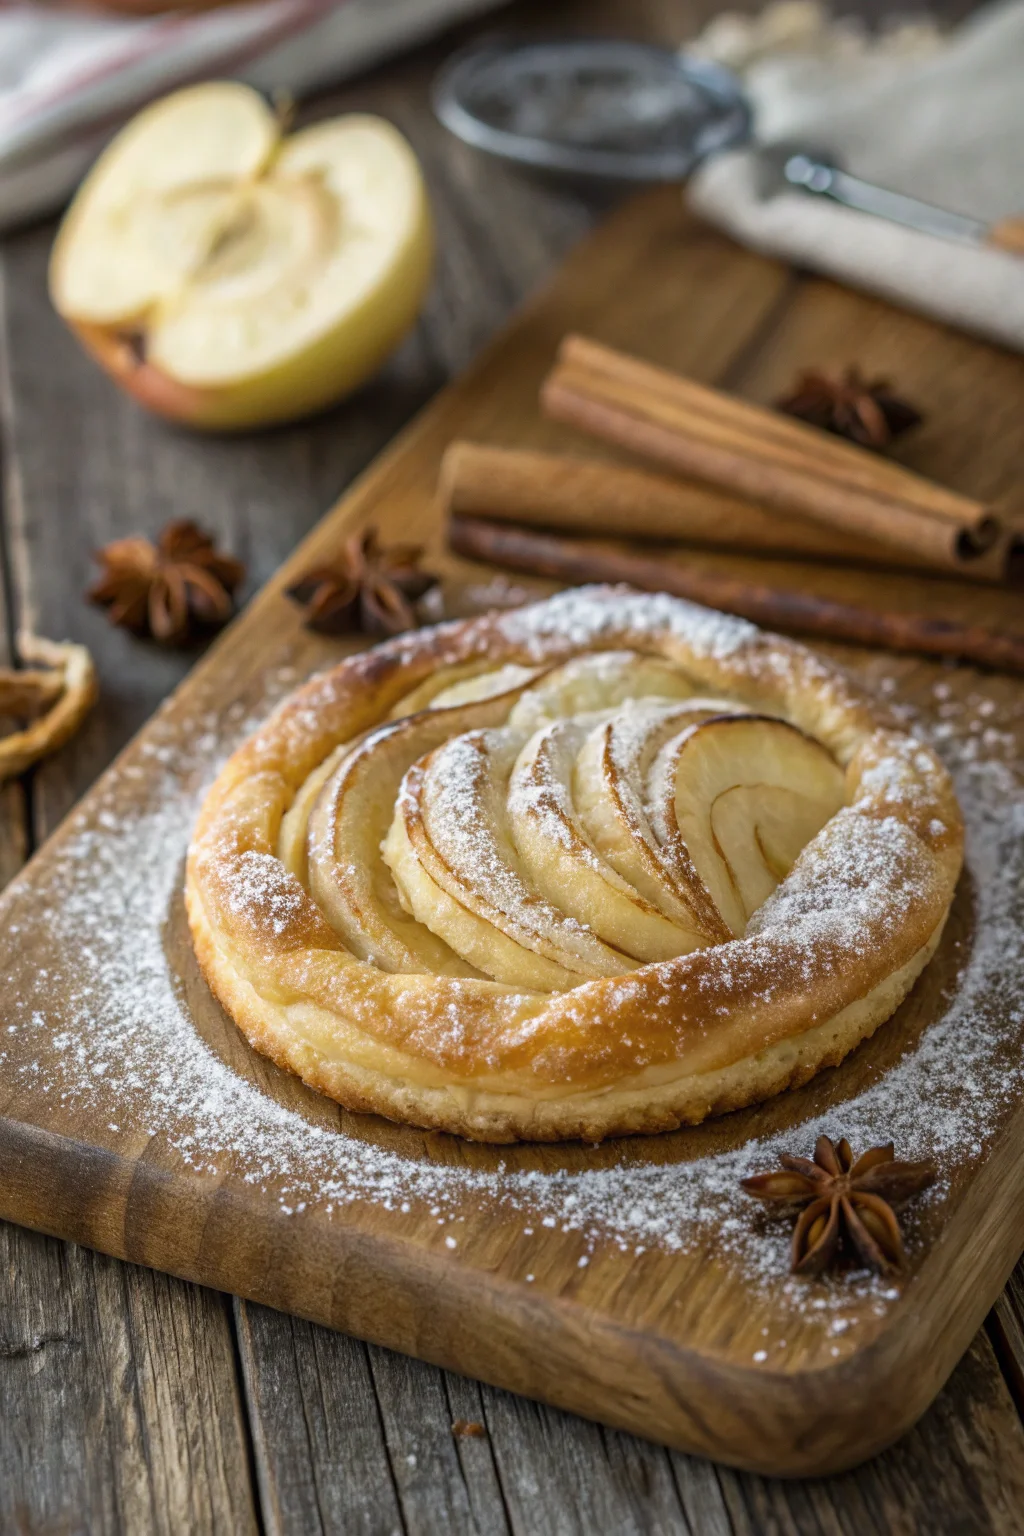
- Rose-Shaped Pastries:
- Layer thin apple slices on a strip of puff pastry, then roll it up to resemble a rose. Bake in a muffin tin for stunning single-serve desserts.
Adding these variations allows you to customize the flavors and appearance of your apple puff pastries, ensuring they’re always exciting and unique. Next, we’ll address the FAQs to tackle common questions about apple puff pastries!
FAQs About Apple Puff Pastries
1. What is the best type of apple to use for puff pastry desserts?
The best apples for puff pastry desserts are those that hold their shape during baking and provide a balance of sweetness and tartness. Granny Smith apples are a popular choice for their firm texture and tangy flavor. Other great options include Honeycrisp, Braeburn, and Fuji apples, depending on your desired sweetness level.
2. Can I use store-bought puff pastry for apple puff pastries?
Yes, store-bought puff pastry is a convenient and reliable option for making apple puff pastries. It saves time and effort while delivering excellent results. Be sure to thaw the pastry properly in the refrigerator before using it and handle it gently to maintain its flaky layers.
3. How do I prevent my puff pastry from becoming soggy with apple filling?
To prevent sogginess:
- Pre-cook the apples: Cooking the filling beforehand helps reduce moisture.
- Cool the filling completely: Warm filling can cause the pastry to become soggy.
- Use cornstarch: Adding cornstarch to the filling thickens the juices.
- Drain excess liquid: Strain any extra moisture from the filling before assembling the pastries.
4. What is the ideal baking temperature for apple puff pastry?
The ideal temperature is 375°F (190°C). This heat ensures the pastry puffs up beautifully while baking evenly. Bake for 20-25 minutes or until the pastries are golden brown and crisp.
5. Can I prepare apple puff pastries ahead of time and bake later?
Yes, you can prepare them in advance. Assemble the pastries, then refrigerate for up to 24 hours or freeze for up to a month. If frozen, bake straight from the freezer, adding an extra 5-7 minutes to the baking time.
6. How do I store leftover apple puff pastries to keep them fresh?
Store cooled pastries in an airtight container in the refrigerator for up to 3 days. For longer storage, wrap them individually and freeze for up to a month. Reheat in the oven or air fryer to restore their crispness. Avoid reheating in the microwave, as it may make the pastry soggy.
Conclusion
Apple puff pastries are the perfect blend of flaky, buttery pastry and sweet, spiced apple filling, making them a timeless dessert for any occasion. Whether you’re a seasoned baker or just starting out, this guide provides everything you need to create bakery-worthy pastries at home. From choosing the best apples and handling store-bought puff pastry to customizing flavors and ensuring proper storage, you now have all the tips and tricks to succeed.
For more comforting and easy-to-make dessert recipes, explore the Ultimate Guide to Pumpkin Dump Cake. It’s perfect for fall and beyond!
Why not treat yourself and your loved ones to these delightful pastries? Pair them with a cup of coffee or a scoop of ice cream for an indulgent experience. Once you’ve mastered the basics, don’t hesitate to experiment with creative variations to make the recipe uniquely yours.
Happy baking!